Working at the command line with Bash
Session Overview
The purpose of this session is to provide familiarity and comfort with the Unix shell for the purposes of working with the course material. It is not meant to be a comprehensive lesson. For more in-depth instruction of using Bash, the default Unix shell, please see the Software Carpentry lesson, “The Unix Shell”
You may see advanced commands in the workshop that are not covered here because of time. If you are curious about what they do, ask one of the instructors or helpers, use the man command (covered in Section 1), or try an online resource such as Stack Overflow (or Google!).
Details of the individual session components are included below:
1. Getting started with the shell
2. Creating and editing text files
3. Running commands and managing output
4. Variables
5. Wildcards
6. Loops and scripts
1. Getting started with the shell
The job of a shell program is to provide a text-based environment for viewing files and directories, running programs and pipelines, and monitoring program status and output. The shell that we will be using in this workshop is called Bash.
After logging in to your instance for this workshop, you should see a Bash prompt, where you can input commands:
ubuntu@ip-172-31-60-130:~$
ubuntu@ip-172-31-60-130:~$ ls
anaconda2  local  MCA  R
ubuntu@ip-172-31-60-130:~$ ls -p
anaconda2/  local/  MCA/  R/
In the example above, you’ll see that two commands have been entered. The first line is empty and just shows the prompt, which is indicated by the text ending in $. The command ls was input in the second line, and the output of that command is shown directly below. The next line shows ls being used with an option, -p. Note how the output has been modified.
So what does ls do?
ls is an abbreviation for “list”, and its purpose is to list the contents of a directory. In most operating systems, files are organized by a hierarchical directory structure. Directories are often called folders and are represented by a file folder in graphical operating system interfaces. Directories can contain both files and subdirectories, the latter of which may also contain additional files and subdirectories, and so on. Considering the following example in macOS:
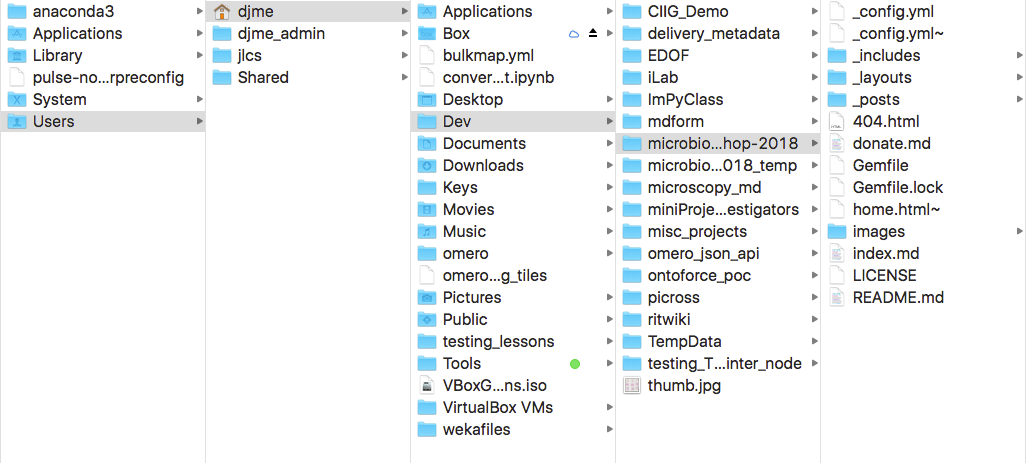
Here, we are looking at the contents of a directory/folder called “microbiome-workshop-2018” (abbreviated as “microbio…hom-2018” by the browser). This directory contains several files (e.g., “donate.md”) and several subdirectories (e.g., “images”); it is itself contained within a parent directory called “Dev”, which is contained in its own parent directory called “djme”, and so on.
When we ran ls above, we showed the contents of a directory. But that was not terribly informative, because the output did not tell us whether the items listed were files or subdirectories. To get that information, we had to modify the ls command. By typing -p after ls, we changed the way that ls displays output. In this case, all of the contents were appended with a forward slash, /, which is a special character in Bash that indicates an item is a directory. Thus the purpose of the -p option is to append the / only to directories, so we learned that anaconda2/, local/, MCA/, and R/ are all subdirectories. But subdirectories of what?
Whenever you are working at the prompt in the shell, you are always working “inside” of a directory. But the directory that you are in is not always obvious, especially when you first start up the shell. To determine your current working directory, you can use the command pwd, which is short for “print working directory”.
ubuntu@ip-172-31-60-130:~$ pwd
/home/ubuntu
In this example, pwd returned a path: /home/ubuntu. This path tells us that we are working in a directory called ubuntu, which itself is contained within a parent directory called home. Note that home is the first listed directory in the path–this means that the parent directory of home is the root directory, or the very base of the directory structure.
We can change our working directory with the command cd, which stands for “change directory”:
ubuntu@ip-172-31-60-130:~$ ls -p
anaconda2/  local/  MCA/  R/
ubuntu@ip-172-31-60-130:~$ cd local
ubuntu@ip-172-31-60-130:~/local$ pwd
/home/ubuntu/local
ubuntu@ip-172-31-60-130:~/local$ ls -p
bin/  src/  usearch6.0.98_i86linux32
You can also change into the parent directory using cd .. as follows:
ubuntu@ip-172-31-60-130:~/local$ cd ..
ubuntu@ip-172-31-60-130:~$ pwd
/home/ubuntu
Finally, you can change directly to any directory by providing its full path:
ubuntu@ip-172-31-60-130:~$ cd /home/ubuntu/MCA/data/16S
ubuntu@ip-172-31-60-130:~/MCA/data/16S$ pwd
/home/ubuntu/MCA/data/16S
ubuntu@ip-172-31-60-130:~/MCA/data/16S$ cd ..
ubuntu@ip-172-31-60-130:~/MCA/data$ pwd
/home/ubuntu/MCA/data
ubuntu@ip-172-31-60-130:~/MCA/data$ cd ../..
ubuntu@ip-172-31-60-130:~$ ls
anaconda2  local  MCA  R
Challenge 1.1: Determine what
cd ../..did in the above example.
Challenge 1.2: Note how the text to the left of$has been changing. What do you think~means?
In the ls examples, we have been using an option, -p, to indicate which items in the directory are subdirectories. There are actually many different options we can use to modify the behavior of ls. For example, we can list directory contents in the “long” format using -l.
ubuntu@ip-172-31-60-130:~$ cd /home/ubuntu/MCA/16s/Session1/fastqs
ubuntu@ip-172-31-60-130:~/MCA/16s/Session1/fastqs$ ls
A_control.R1_sub.fastq  D_control.R1_sub.fastq  G_control.R1_sub.fastq  J_disease.R1_sub.fastq  M_disease.R1_sub.fastq
A_control.R2_sub.fastq  D_control.R2_sub.fastq  G_control.R2_sub.fastq  J_disease.R2_sub.fastq  M_disease.R2_sub.fastq
B_control.R1_sub.fastq  E_control.R1_sub.fastq  H_disease.R1_sub.fastq  K_disease.R1_sub.fastq  N_disease.R1_sub.fastq
B_control.R2_sub.fastq  E_control.R2_sub.fastq  H_disease.R2_sub.fastq  K_disease.R2_sub.fastq  N_disease.R2_sub.fastq
C_control.R1_sub.fastq  F_control.R1_sub.fastq  I_disease.R1_sub.fastq  L_disease.R1_sub.fastq  O_disease.R1_sub.fastq
C_control.R2_sub.fastq  F_control.R2_sub.fastq  I_disease.R2_sub.fastq  L_disease.R2_sub.fastq  O_disease.R2_sub.fastq
ubuntu@ip-172-31-60-130:~/MCA/16s/Session1/fastqs$ ls -p -l
total 23104
-rw-r--r-- 1 ubuntu ubuntu 782917 Nov  8  2017 A_control.R1_sub.fastq
-rw-r--r-- 1 ubuntu ubuntu 782917 Nov  8  2017 A_control.R2_sub.fastq
-rw-r--r-- 1 ubuntu ubuntu 782975 Nov  8  2017 B_control.R1_sub.fastq
-rw-r--r-- 1 ubuntu ubuntu 782975 Nov  8  2017 B_control.R2_sub.fastq
-rw-r--r-- 1 ubuntu ubuntu 782914 Nov  8  2017 C_control.R1_sub.fastq
-rw-r--r-- 1 ubuntu ubuntu 782914 Nov  8  2017 C_control.R2_sub.fastq
-rw-r--r-- 1 ubuntu ubuntu 782896 Nov  8  2017 D_control.R1_sub.fastq
-rw-r--r-- 1 ubuntu ubuntu 782896 Nov  8  2017 D_control.R2_sub.fastq
-rw-r--r-- 1 ubuntu ubuntu 782939 Nov  8  2017 E_control.R1_sub.fastq
-rw-r--r-- 1 ubuntu ubuntu 782939 Nov  8  2017 E_control.R2_sub.fastq
-rw-r--r-- 1 ubuntu ubuntu 782959 Nov  8  2017 F_control.R1_sub.fastq
-rw-r--r-- 1 ubuntu ubuntu 782959 Nov  8  2017 F_control.R2_sub.fastq
-rw-r--r-- 1 ubuntu ubuntu 782927 Nov  8  2017 G_control.R1_sub.fastq
-rw-r--r-- 1 ubuntu ubuntu 782927 Nov  8  2017 G_control.R2_sub.fastq
-rw-r--r-- 1 ubuntu ubuntu 787672 Nov  8  2017 H_disease.R1_sub.fastq
-rw-r--r-- 1 ubuntu ubuntu 787672 Nov  8  2017 H_disease.R2_sub.fastq
-rw-r--r-- 1 ubuntu ubuntu 787699 Nov  8  2017 I_disease.R1_sub.fastq
-rw-r--r-- 1 ubuntu ubuntu 787699 Nov  8  2017 I_disease.R2_sub.fastq
-rw-r--r-- 1 ubuntu ubuntu 787685 Nov  8  2017 J_disease.R1_sub.fastq
-rw-r--r-- 1 ubuntu ubuntu 787685 Nov  8  2017 J_disease.R2_sub.fastq
-rw-r--r-- 1 ubuntu ubuntu 787662 Nov  8  2017 K_disease.R1_sub.fastq
-rw-r--r-- 1 ubuntu ubuntu 787662 Nov  8  2017 K_disease.R2_sub.fastq
-rw-r--r-- 1 ubuntu ubuntu 787679 Nov  8  2017 L_disease.R1_sub.fastq
-rw-r--r-- 1 ubuntu ubuntu 787679 Nov  8  2017 L_disease.R2_sub.fastq
-rw-r--r-- 1 ubuntu ubuntu 787678 Nov  8  2017 M_disease.R1_sub.fastq
-rw-r--r-- 1 ubuntu ubuntu 787678 Nov  8  2017 M_disease.R2_sub.fastq
-rw-r--r-- 1 ubuntu ubuntu 787702 Nov  8  2017 N_disease.R1_sub.fastq
-rw-r--r-- 1 ubuntu ubuntu 787702 Nov  8  2017 N_disease.R2_sub.fastq
-rw-r--r-- 1 ubuntu ubuntu 787695 Nov  8  2017 O_disease.R1_sub.fastq
-rw-r--r-- 1 ubuntu ubuntu 787695 Nov  8  2017 O_disease.R2_sub.fastq
Note that in the long format, there is one file listed per line, and each file has some associated information listed in columns. The first four columns won’t be covered here. The fifth column gives the file size in bytes. The sixth column gives the date the file was last modified. The last column lists the file name.
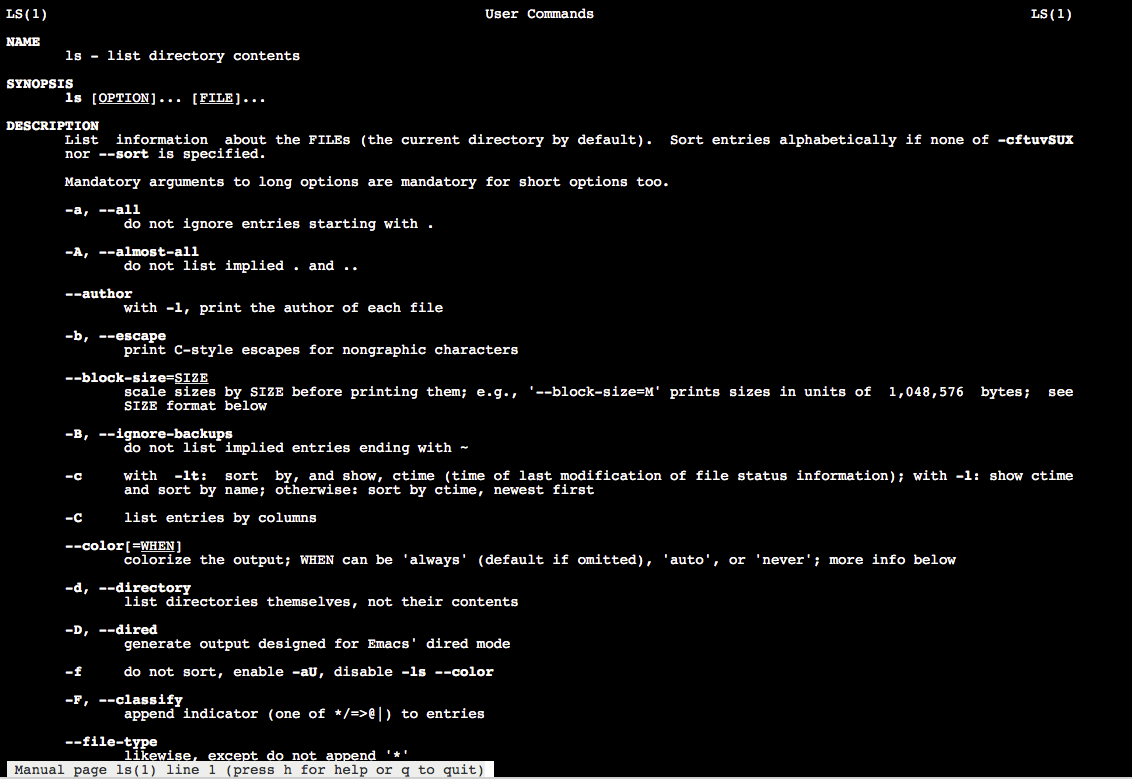
Most commands have options, and they almost always start with - or --. To look at available options for a command, and to find other useful information, use man:
ubuntu@ip-172-31-60-130:~/MCA/16s/Session1/fastqs$ cd ~
ubuntu@ip-172-31-60-130:~$ man ls
This will take you to that manual page for the command. To exit, type q.
To create a new directory, use mkdir, which stands for “make directory”:
ubuntu@ip-172-31-60-130:~$ ls -p
anaconda2/  local/  MCA/  R/
ubuntu@ip-172-31-60-130:~$ mkdir test1
ubuntu@ip-172-31-60-130:~$ mkdir test2
ubuntu@ip-172-31-60-130:~$ ls -p
anaconda2/  local/  MCA/  R/  test1/  test2/
cp and mv can be used to copy and move files, respectively. To test this, first create a ‘blank’ file using touch:
ubuntu@ip-172-31-60-130:~$ cd test1
ubuntu@ip-172-31-60-130:~/test1$ touch file1
ubuntu@ip-172-31-60-130:~/test1$ ls -p
file1
cp and mv work similarly in that they take two strings of text, called arguments, the source file and the destination. For example:
ubuntu@ip-172-31-60-130:~/test1$ cp file1 file2
ubuntu@ip-172-31-60-130:~/test1$ ls -p
file1  file2
ubuntu@ip-172-31-60-130:~/test1$ mv file1 /home/ubuntu/test2
ubuntu@ip-172-31-60-130:~/test1$ ls -p
file2
ubuntu@ip-172-31-60-130:~/test1$ cd /home/ubuntu/test2
ubuntu@ip-172-31-60-130:~/test2$ ls
file1
Challenge 1.3: Create a new folder
~/test3and move both files into it
Challenge 1.4: Try renamingfile2to something else. Hint: think about whatmvdoes!
Files can be removed with rm:
ubuntu@ip-172-31-60-130:~/test2$ rm file1
ubuntu@ip-172-31-60-130:~/test2$ ls
ubuntu@ip-172-31-60-130:~/test2$ cd ~/test1
ubuntu@ip-172-31-60-130:~/test1$ ls
file2
ubuntu@ip-172-31-60-130:~/test1$ rm file2
ubuntu@ip-172-31-60-130:~/test1$ ls
ubuntu@ip-172-31-60-130:~/test1$
Directories can be removed with rmdir:
ubuntu@ip-172-31-60-130:~/test1$ cd ..
ubuntu@ip-172-31-60-130:~$ ls -p
anaconda2/  local/  MCA/  R/  test1/  test2/
ubuntu@ip-172-31-60-130:~$ rmdir test1
ubuntu@ip-172-31-60-130:~$ ls -p
anaconda2/  local/  MCA/  R/  test2/
ubuntu@ip-172-31-60-130:~$ rmdir test2
ubuntu@ip-172-31-60-130:~$ ls -p
anaconda2/  local/  MCA/  R/
Challenge 1.5: What happens when you try to remove a directory with
rm?
Challenge 1.6: What happens when you try tormdira directory that contains a file?
2. Creating and editing text files
The Bash shell gives us access to several useful Unix utilites for working with text and text files. We’ll start with a very simple command called echo, which simply repeats text back that is given as an argument. For example:
ubuntu@ip-172-31-60-130:~$ mkdir text_files
ubuntu@ip-172-31-60-130:~$ cd text_files
ubuntu@ip-172-31-60-130:~/text_files$ echo "Hello world!"
Hello world!
Here, the echo command has taken the input text and directed it to our screen as Standard Output, or stdout. We can redirect stdout to a file using the > character. For example:
ubuntu@ip-172-31-60-130:~/text_files$ echo "Hello world!" > greeting.txt
ubuntu@ip-172-31-60-130:~/text_files$ ls
greeting.txt
Challenge 2.1: Create a text file called
text_file1.txtthat contains the line “Roses are red”.
Challenge 2.2: Try viewing the content of your file with thecatcommand:cat text_file1.txt.
Now what if you want to edit the file you just created? For this, we will use a basic text editor called Nano. For details on how to use Nano, see the online documentation. One nice thing about nano is that it give you some command shortcuts right on the screen when you have it open. Note that the caret symbol (^) indicates that you should hold the control key while pressing the associated letter key. For example, ^X means that you should hold control and press the X key.
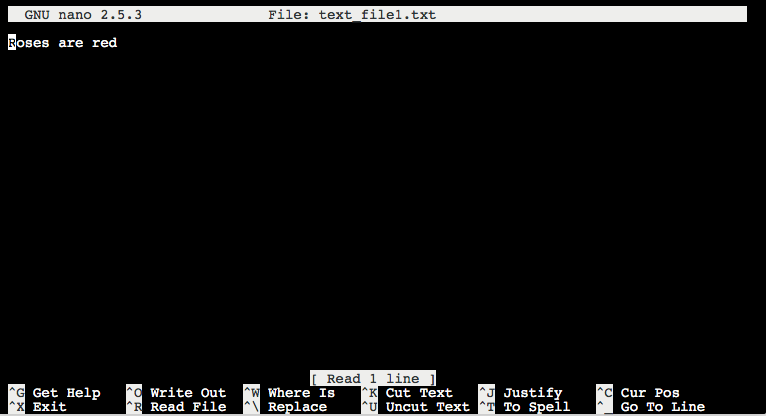
Challenge 2.3: Add a new line to your document: “Violets are blue”.
Challenge 2.4: Try saving the document, closing it, and re-opening it.
Challenge 2.5: Create a second file calledtext_file2.txtthat contains the rest of our poem:There are trillions of bacteria
Living on you!
You used the cat command above to view the contents of text_file1.txt. cat is short for concatenate, because it can operate on multiple files to concatenate the contents. For example:
ubuntu@ip-172-31-60-130:~/text_files$ cat text_file1.txt text_file2.txt
Roses are red
Violets are blue
There are trillions of bacteria
Living on you!
By redirecting the stdout from cat to a file, you can create a new text file that is a concatenation of the input text files:
ubuntu@ip-172-31-60-130:~/text_files$ cat greeting.txt text_file1.txt text_file2.txt > poem.txt
ubuntu@ip-172-31-60-130:~/text_files$ cat poem.txt
Hello world!
Roses are red
Violets are blue
There are trillions of bacteria
Living on you!
3. Running commands and managing output
As mentioned above, Bash gives you access to dozens of small programs that are very useful for dealing with text files. Because these tools are at their most powerful when working with large text files, lets grab one using wget (“World Wide Web get”).
ubuntu@ip-172-31-60-130:~/text_files$ wget http://www.gutenberg.org/files/100/100-0.txt
--2018-11-08 21:10:26--  http://www.gutenberg.org/files/100/100-0.txt
Resolving www.gutenberg.org (www.gutenberg.org)... 152.19.134.47, 2610:28:3090:3000:0:bad:cafe:47
Connecting to www.gutenberg.org (www.gutenberg.org)|152.19.134.47|:80... connected.
HTTP request sent, awaiting response... 200 OK
Length: 5852404 (5.6M) [text/plain]
Saving to: ‘100-0.txt’

100-0.txt                        100%[=========================================================>]   5.58M  21.0MB/s    in 0.3s

2018-11-08 21:10:26 (21.0 MB/s) - ‘100-0.txt’ saved [5852404/5852404]

ubuntu@ip-172-31-60-130:~/text_files$ ls -hl
total 5.6M
-rw-rw-r-- 1 ubuntu ubuntu 5.6M Jun 14 15:16 100-0.txt
-rw-rw-r-- 1 ubuntu ubuntu   13 Nov  8 20:26 greeting.txt
-rw-rw-r-- 1 ubuntu ubuntu   92 Nov  8 20:41 poem.txt
-rw-rw-r-- 1 ubuntu ubuntu   31 Nov  8 20:38 text_file1.txt
-rw-rw-r-- 1 ubuntu ubuntu   48 Nov  8 20:36 text_file2.txt
Note that the -h option was used with ls in the above example. This option makes the file size information “human readable”. You can see that the file that was downloaded, 100-0.txt, is about 5.6 megabytes. That’s a big text file! Using cat on this file is not very useful to inspect its contents (give it a try and you’ll see).
One nice option for browsing very large text files is less (usage example: $ less 100-0.txt; to exit, type the letter q). This displays one screen’s worth of the file contents and allows you to scroll through. However, this is still inefficient, depending on what you want to do with the text.
If you just want to check out the first few lines of text, you can try head:
ubuntu@ip-172-31-60-130:~/text_files$ head 100-0.txt

Project Gutenberg’s The Complete Works of William Shakespeare, by William
Shakespeare

This eBook is for the use of anyone anywhere in the United States and
most other parts of the world at no cost and with almost no restrictions
whatsoever.  You may copy it, give it away or re-use it under the terms
of the Project Gutenberg License included with this eBook or online at
www.gutenberg.org.  If you are not located in the United States, you’ll
have to check the laws of the country where you are located before using
You can specify the number of lines you want to inspect by supplying an option (an integer):
ubuntu@ip-172-31-60-130:~/text_files$ head -3 100-0.txt

Project Gutenberg’s The Complete Works of William Shakespeare, by William
Shakespeare
ubuntu@ip-172-31-60-130:~/text_files$ head -20 100-0.txt

Project Gutenberg’s The Complete Works of William Shakespeare, by William
Shakespeare

This eBook is for the use of anyone anywhere in the United States and
most other parts of the world at no cost and with almost no restrictions
whatsoever.  You may copy it, give it away or re-use it under the terms
of the Project Gutenberg License included with this eBook or online at
www.gutenberg.org.  If you are not located in the United States, you’ll
have to check the laws of the country where you are located before using
this ebook.

See at the end of this file: * CONTENT NOTE (added in 2017) *


Title: The Complete Works of William Shakespeare

Author: William Shakespeare

Release Date: January 1994 [EBook #100]
Another very useful command for inspecting a text file is wc, which stands for “word count”. This lists the lines, words, and characters in your text file:
ubuntu@ip-172-31-60-130:~/text_files$ wc 100-0.txt
 149689  959894 5852404 100-0.txt
ubuntu@ip-172-31-60-130:~/text_files$ wc -l 100-0.txt
149689 100-0.txt
ubuntu@ip-172-31-60-130:~/text_files$ wc -w 100-0.txt
959894 100-0.txt
ubuntu@ip-172-31-60-130:~/text_files$ wc -c 100-0.txt
5852404 100-0.txt
Note that options can be used to return only the lines (-l), words (-w), or characters (-c) in the file.
grep is a particularly powerful command, because it allows you to filter lines of text using input strings. For example, if I want to return only lines from 100-0.txt that contain the word “needle”, I can do this:
ubuntu@ip-172-31-60-130:~/text_files$ grep needle 100-0.txt
    First, for his weeping into the needless stream:
    Their needless vouches? Custom calls me tot.
    Myself by with a needle, that I might prick
    Of space had pointed him sharp as my needle;
              With needless jealousy,
    their needles, but it will be thought we keep a bawdy-house
    Their needles to lances, and their gentle hearts
    When with a volley of our needless shot,
maledictions against King and nobles; needless diffidences, banishment
  KATHARINE. How needless was it then to ask the question!
  ISABELLA. In brief- to set the needless process by,
    Have with our needles created both one flower,
    needle, an admirable musician. O, she will sing the savageness
Or when she would with sharp needle wound,
    To thread the postern of a small needles eye.
    Pray God, I say, I prove a needless coward.
Go ply thy needle; meddle not with her.
Valance of Venice gold in needlework;
Marry, sir, with needle and thread.
    They were the most needless creatures living, should we neer
That matter needless, of importless burden,
As will stop the eye of Helen’s needle, for whom he comes to fight.
    At each his needless heavings- such as you
Lucretias glove, wherein her needle sticks;
Challenge 3.1: Create a new file called
Romeo.txtthat contains only lines from100-0.txtwith the word “Romeo”
Challenge 3.2: How many lines, words, and characters are inRomeo.txt?
grep also has an option, -v that will return only lines that don’t contain the input string. For example, if I want to only return lines from Romeo.txt that do not contain the letter “t”, I could do this:
ubuntu@ip-172-31-60-130:~/text_files$ grep -v t Romeo.txt
Now Romeo is belov’d, and loves again,
Romeo! My cousin Romeo! Romeo!
Romeo! Humours! Madman! Passion! Lover!
Romeo.
Here comes Romeo, here comes Romeo!
Romeo, away, be gone!
Give me my Romeo, and when I shall die,
Romeo can,
All slain, all dead. Romeo is banished,
Where is my lady’s lord, where’s Romeo?
Romeo is coming.
Ere I again behold my Romeo.
Romeo.
Romeo! [_Advances._]
 [_Falls on Romeo’s body and dies._]
As rich shall Romeo’s by his lady’s lie,
Thus far, we have been using only one command at a time. However, the true power of Unix-based operating systems comes from the ability to string multiple commands in succession. This is called a pipeline and is acheived by redirecting the output of one command to the input of another command through the use of the pipe character, |.
Lets take a look at an example using grep.
ubuntu@ip-172-31-60-130:~/text_files$ grep Romeo 100-0.txt | grep love
Now Romeo is belov’d, and loves again,
Romeo, the love I bear thee can afford
In this example, we ran the grep Romeo 100-0.txt command, which searches the file 100-0.txt for the text “Romeo”. Usually, this will send the output to your screen through stdout. However, the pipe | redirects that output to a second grep, which is searching for “love”. Notice that no file is specified for the second command. This is because it is instead operating on standard input, or stdin. So what the | actually does is take the stdout of one command and send it to another command as stdin.
Another way to accomplish the above example is by starting with cat:
ubuntu@ip-172-31-60-130:~/text_files$ cat 100-0.txt | grep Romeo | grep love
Now Romeo is belov’d, and loves again,
Romeo, the love I bear thee can afford
Now we can start to combine the commands we have learned to accomplish some pretty interesting tasks. For example, you can combing grep with wc to count instances of a word. To understand how to do this, you first need to know that the -o option of grep will return only matching text:
ubuntu@ip-172-31-60-130:~/text_files$ cat 100-0.txt | grep -o orange
orange
orange
orange
orange
orange
So if you want to count the number of instances of the word orange in the complete works of Shakespeare (which is what the 100-0.txt file actually is, in case you have not yet noticed), you can do the following:
ubuntu@ip-172-31-60-130:~/text_files$ cat 100-0.txt | grep -o orange | wc -w
5
Challenge 3.3: How many lines of
100-0.txtcontain “trouble”?
Challenge 3.4: By combining commands with pipes, come up a way to count the number of .txt files in a directory
4. Variables
Text can be assigned to variables and used later in Bash. For example:
ubuntu@ip-172-31-60-130:~/text_files$ greeting="Hello"
ubuntu@ip-172-31-60-130:~/text_files$ echo $greeting
Hello
ubuntu@ip-172-31-60-130:~/text_files$ echo greeting
greeting
In this example, we assigned the text "Hello" to the variable greeting. Notice that to use the variable later with echo, we had to use the $ character. You can use variables in combination with other input too:
ubuntu@ip-172-31-60-130:~/text_files$ echo $greeting world!
Hello world!
However, whitespace matters when referencing variables:
ubuntu@ip-172-31-60-130:~/text_files$ echo $greeting How are you?
Hello How are you?
ubuntu@ip-172-31-60-130:~/text_files$ echo $greetingHow are you?
are you?
Notice in the first example, everything worked as expected. But not in the second case. This is because $greetingHow was seen as one variable, which was empty, so echo only printed are you?. In these cases, you can use curly braces, {}, to clarify which text belongs to the variable name:
ubuntu@ip-172-31-60-130:~/text_files$ echo ${greeting}How are you?
HelloHow are you?
Because commands in Bash are text, you can store commands in variables too:
ubuntu@ip-172-31-60-130:~/text_files$ MyDirectory=pwd
ubuntu@ip-172-31-60-130:~/text_files$ $MyDirectory
/home/ubuntu/text_files
ubuntu@ip-172-31-60-130:~/text_files$ cd ..
ubuntu@ip-172-31-60-130:~$ $MyDirectory
/home/ubuntu
In this example, the text “pwd” was stored in the variable $MyDirectory, so when $MyDirectory was used on the next line, Bash automatically substituted “pwd” at the command line, which led to the execution of the pwd command. When we changed to the parent directory with cd .., the output of pwd changed.
Sometimes, you might want to assign the output of a command to a variable, not the actual command itself. In this case, you can use backticks, `:
ubuntu@ip-172-31-60-130:~$ cd text_files/
ubuntu@ip-172-31-60-130:~/text_files$ homebase=`pwd`
ubuntu@ip-172-31-60-130:~/text_files$ $homebase
bash: /home/ubuntu/text_files: Is a directory
ubuntu@ip-172-31-60-130:~/text_files$ echo $homebase
/home/ubuntu/text_files
ubuntu@ip-172-31-60-130:~/text_files$ cd ..
ubuntu@ip-172-31-60-130:~$ echo $homebase
/home/ubuntu/text_files
ubuntu@ip-172-31-60-130:~$ cd $homebase
ubuntu@ip-172-31-60-130:~/text_files$
In this example, the backticks resulted in pwd being run, and the output, which was the text “/home/ubuntu/text_files”, was saved in the variable $homebase. When $homebase was used by itself of the next line, Bash gave an error, because Bash does not take paths as commands by themselves. By using echo, we verified which text was being stored in $homebase. This text did not change when we changed directories. Thus when $homebase was used with cd, we changed to the directory that we were working in when we assigned the output of pwd to $homebase in the first place.
5. Wildcards
Wildcards are special characters in Bash that can stand in for other characters. Two important wildcards are * and ?. The * can stand in for any number of characters, whereas the ? can stand in for any single character. For example:
ubuntu@ip-172-31-60-130:~/text_files$ cat text_file1.txt
Roses are red
Violets are blue
ubuntu@ip-172-31-60-130:~/text_files$ cat text_file2.txt
There are trillions of bacteria
Living on you!

ubuntu@ip-172-31-60-130:~/text_files$ cat text_file?.txt
Roses are red
Violets are blue
There are trillions of bacteria
Living on you!
In the example above, by using the ? character, text_file?.txt was expanded to text_file1.txt text_file2.txt, so cat returned the text of both of them.
ubuntu@ip-172-31-60-130:~/text_files$ ls
100-0.txt  greeting.txt  poem.txt  Romeo.txt  text_file1.txt  text_file2.txt
ubuntu@ip-172-31-60-130:~/text_files$ rm text*
ubuntu@ip-172-31-60-130:~/text_files$ ls
100-0.txt  greeting.txt  poem.txt  Romeo.txt
ubuntu@ip-172-31-60-130:~/text_files$ rm *.txt
ubuntu@ip-172-31-60-130:~/text_files$ ls
In the above example, rm text* expanded to rm text_file1.txt text_file2.txt, so both of those files were removed. rm *.txt removed all of the files ending in .txt, which in this case was all of them.
To finish this section, lets now delete this empty directory:
ubuntu@ip-172-31-60-130:~/text_files$ cd ..
ubuntu@ip-172-31-60-130:~$ rmdir text_files/
ubuntu@ip-172-31-60-130:~$ ls -p
anaconda2/  local/  MCA/  R/
6. Loops and scripts
We’ve explored how Bash commands can be combined through the use of pipes, but we can also script a series of commands together to perform a task. Lets create a simple Bash script in nano:
ubuntu@ip-172-31-60-130:~$ nano count_ten.sh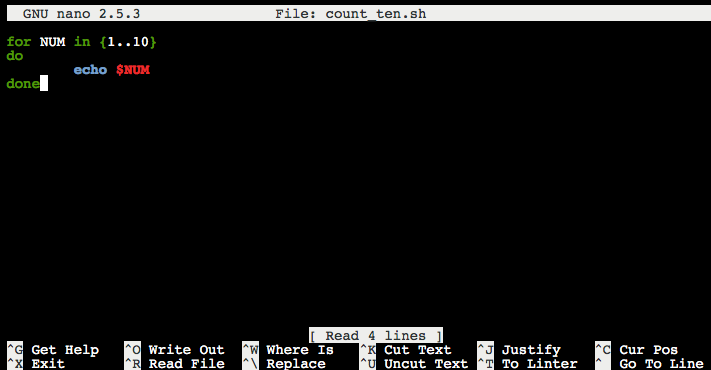
There is a lot going on in that script so lets walk through it. This script contains a single FOR loop. This is a special construct for performing an iterative task. This particular FOR loop does the following:
1) It assigns a value to the variable $NUM from a list of values created by {1..10}. Bash knows that {1..10} means “create a list from 1 to 10”. The first time through the loop, $NUM takes on the first value in the list, so the number 1. The next time through the loop, $NUM takes on the value 2, and so on.
2) Using the current value for $NUM, the code between do and done is executed.
3) If there are any values left in the {1..10} list, the do/done block will evaluate again with the next value. If the list has been completely run through, the loop finishes.
We can see this in action, but to do so, we first need to indicate that count_ten.sh is an executable script. To do that, we use the chmod command. Don’t worry too much about the details of what is going on with the chmod command itself–just note that change that it causes:
ubuntu@ip-172-31-60-130:~$ ls -lp
total 20
drwxrwxr-x 22 ubuntu ubuntu 4096 Nov  6 13:28 anaconda2/
-rw-rw-r--  1 ubuntu ubuntu   38 Nov  9 19:49 count_ten.sh
drwxrwxr-x  4 ubuntu ubuntu 4096 Nov 15  2017 local/
drwxrwxr-x  6 ubuntu ubuntu 4096 Nov 12  2017 MCA/
drwxr-xr-x  3 ubuntu ubuntu 4096 Nov  8  2017 R/
ubuntu@ip-172-31-60-130:~$ chmod 775 count_ten.sh
ubuntu@ip-172-31-60-130:~$ ls -lp
total 20
drwxrwxr-x 22 ubuntu ubuntu 4096 Nov  6 13:28 anaconda2/
-rwxrwxr-x  1 ubuntu ubuntu   38 Nov  9 19:49 count_ten.sh
drwxrwxr-x  4 ubuntu ubuntu 4096 Nov 15  2017 local/
drwxrwxr-x  6 ubuntu ubuntu 4096 Nov 12  2017 MCA/
drwxr-xr-x  3 ubuntu ubuntu 4096 Nov  8  2017 R/
Notice that the first column changed due to the chmod 775 command. Specifically, an x appeared in the 4th, 7th, and 10th positions. This means that the script is now eXecutable to the file owner, anyone in the file owners group, and any user in any group, respectively. Making a file executable will also often make the file name print in a different color when you inspect a directory with ls.
Lets take a look at one final example script:
ubuntu@ip-172-31-60-130:~$ nano make_folders.sh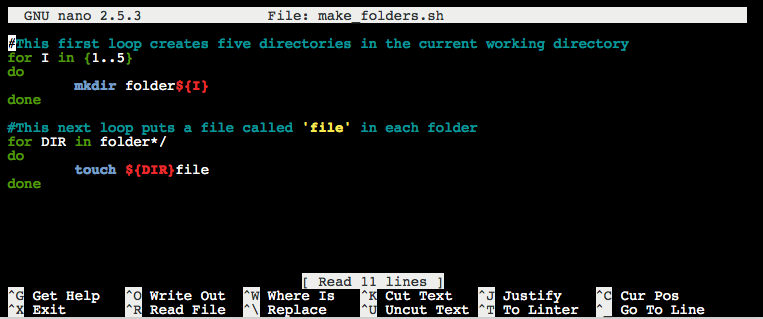
ubuntu@ip-172-31-60-130:~$ chmod 775 make_folders.sh
ubuntu@ip-172-31-60-130:~$ ./make_folders.sh
ubuntu@ip-172-31-60-130:~$ ls -p
anaconda2/    folder1/  folder3/  folder5/  make_folders.sh  R/
count_ten.sh  folder2/  folder4/  local/    MCA/
ubuntu@ip-172-31-60-130:~$ cd folder1
ubuntu@ip-172-31-60-130:~/folder1$ ls -p
file
Final Challenge: Delete folder1-5 to clean up after the lesson!