Annotation classes
Every region has a class (a label such as Tumor), and every class has a colour. Classes live in the
Region Editor's Classes panel and in the Manage annotation classes dialog. See
Annotation classes for the full reference.
Classify one region
- Open the Region Editor with
 .
- Click the region's Class cell and pick a class from the dropdown. Its colour follows the class.
- For a name that is not in the list, click in the cell, type the name and press Enter (Esc cancels).
Relabel many regions at once
- Select the regions: in the table, click the first row and Ctrl-click or Shift-click others; or on the image, Shift-click them in Selection mode.
- Click Edit class on selected rows.
- Pick a class in Choose a class… (it applies straight away), or type a new name in …or a new class and press Enter or click .
Shortcut: with regions selected, click a class name in the Classes panel to apply it to them.
Set up class presets for a project
A preset gives a class name a fixed colour. Every region with that class, including regions loaded later from a GeoJSON file, is drawn in that colour, so an annotation type always looks the same.
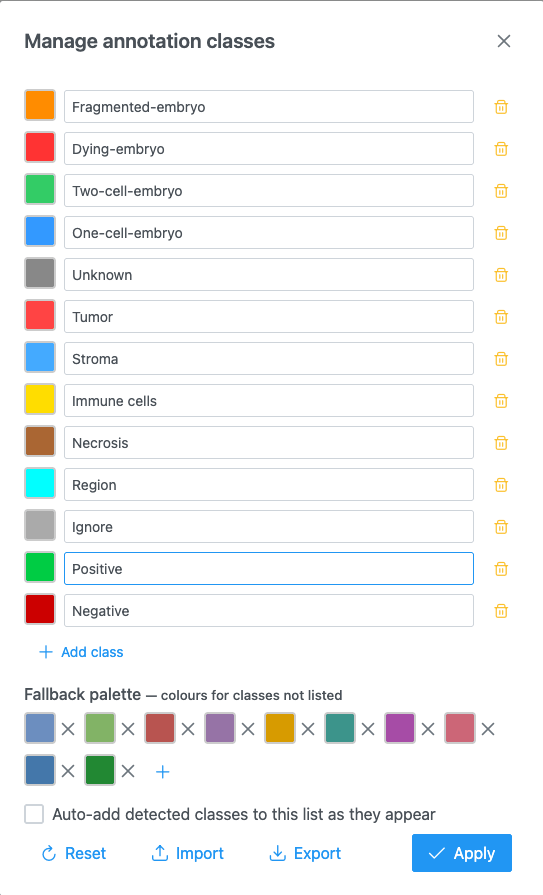
- In the Region Editor's Classes header, click Manage.
- Click Add class. Type the class name exactly as it appears in your data (for example
Tumor) and pick its colour from the swatch. Repeat for each class. - Remove classes you do not need with their trash icon.
- Set Label matching: Exact (default) or Normalized, which ignores case and surrounding
spaces so that
tumormatchesTumor. - Click Apply.
Where presets are saved
In an application with a server (such as JAX Image Tools), presets are saved for your user account and follow you across images and sessions. In the demo, or any host without that storage, they last only until you reload the page; export them to keep them.
Warning
Reset and Import take effect immediately, without Apply. Closing the dialog with × discards other unapplied edits.
Share presets with your team
- In Manage, click Export. The browser saves
annotation-classes.jsonwith the classes, the fallback palette, the auto-add setting and the matching mode. - Send the file to a colleague.
- They open Manage, click Import and pick the file. The message "Classes imported" confirms it.
A file that is not a class list is rejected with "Import failed".
Choose colours for classes that have no preset
Classes that are not in your list get a colour from the fallback palette. The same name always gets the same colour.
- In Manage, under Fallback palette, click a swatch to change it, × to remove it, or + to add one.
- Click Apply.
Recolour every region of a class
Click the class's colour swatch in the Classes panel (or in Manage) and pick a colour. All regions of that class update at once.
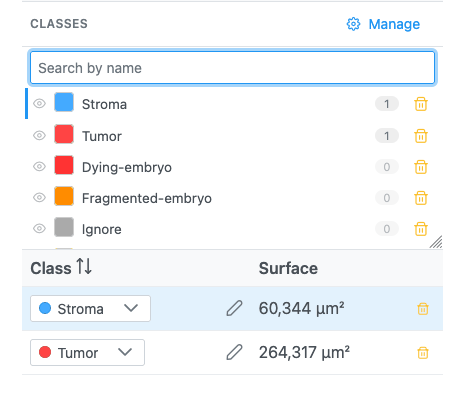
Regions whose colour you set individually are not changed (see below).
Give a few regions their own colour
- Select the regions.
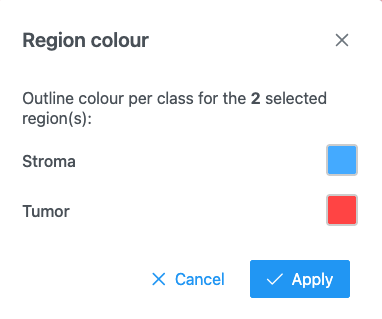
- Click Edit colour of selected regions.
- The Region colour dialog has one colour per class among the selection; unclassified regions are grouped as Unclassified. Pick the colours and click Apply.
These regions keep their colour even if their class's colour changes later.
Hide a class
Click the next to the class in the Classes panel. Its regions are hidden on the image; click again to show them.
Remove a class
Click its trash icon in the Classes panel or in Manage. Its regions go back to the class Region. The default class Region cannot be removed while it is in use.
Find a class in a long list
Type in Search by name at the top of the Classes panel. Press Enter to pick the first match.
Work with a class tree (atlases)
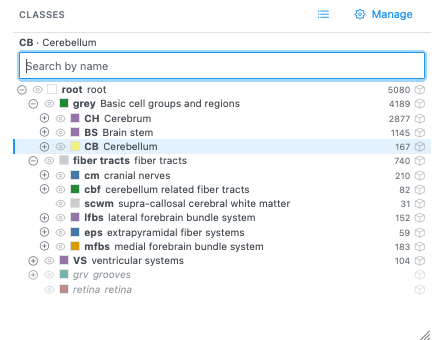
Region sets imported with a hierarchy, such as a brain atlas, show their classes as a tree.
- Click / to expand or collapse a branch.
- Click a class (or press Enter on it) to pick it and all its subclasses; their regions are selected. Shift-, Ctrl- or Cmd-click adds to the pick.
- The eye hides a class and its subclasses; a partly hidden branch shows a partial eye.
- Switch between tree and flat list with / .
Classes that have no region on the current slice are greyed out.
About the auto-add setting
Auto-add detected classes to this list as they appear in Manage adds classes found in loaded files to
your presets. Note that while the Region Editor is open, class names found on the image's regions (for
example sam or cell from AI segmentation) are added to the class list anyway, whatever this setting.
Remove the ones you do not want with their trash icon.
Which class do new regions get?
Newly drawn regions always start in the class Region. AI segmentation adds regions in the class sam (SAM) or cell (Cellpose). Classify them afterwards with the steps above.