Annotate your first image
In this tutorial you draw regions on a muscle image with several tools, edit their outlines, group them into classes in the Region Editor, and export them as a GeoJSON file that QuPath and other tools can read.
Time: about 20 minutes. You need: the live demo.
1. Open the image and the Region Editor
- Open the live demo and click the sample img01.png.
- Click
 Open the Region Editor in the toolbar.
What you should see: the Region Editor opens as a floating window on the right. It has its own toolbar, a Classes panel and an empty table. You can drag it by its title bar and leave it open while you draw.
2. Draw a rectangle and a freeform region
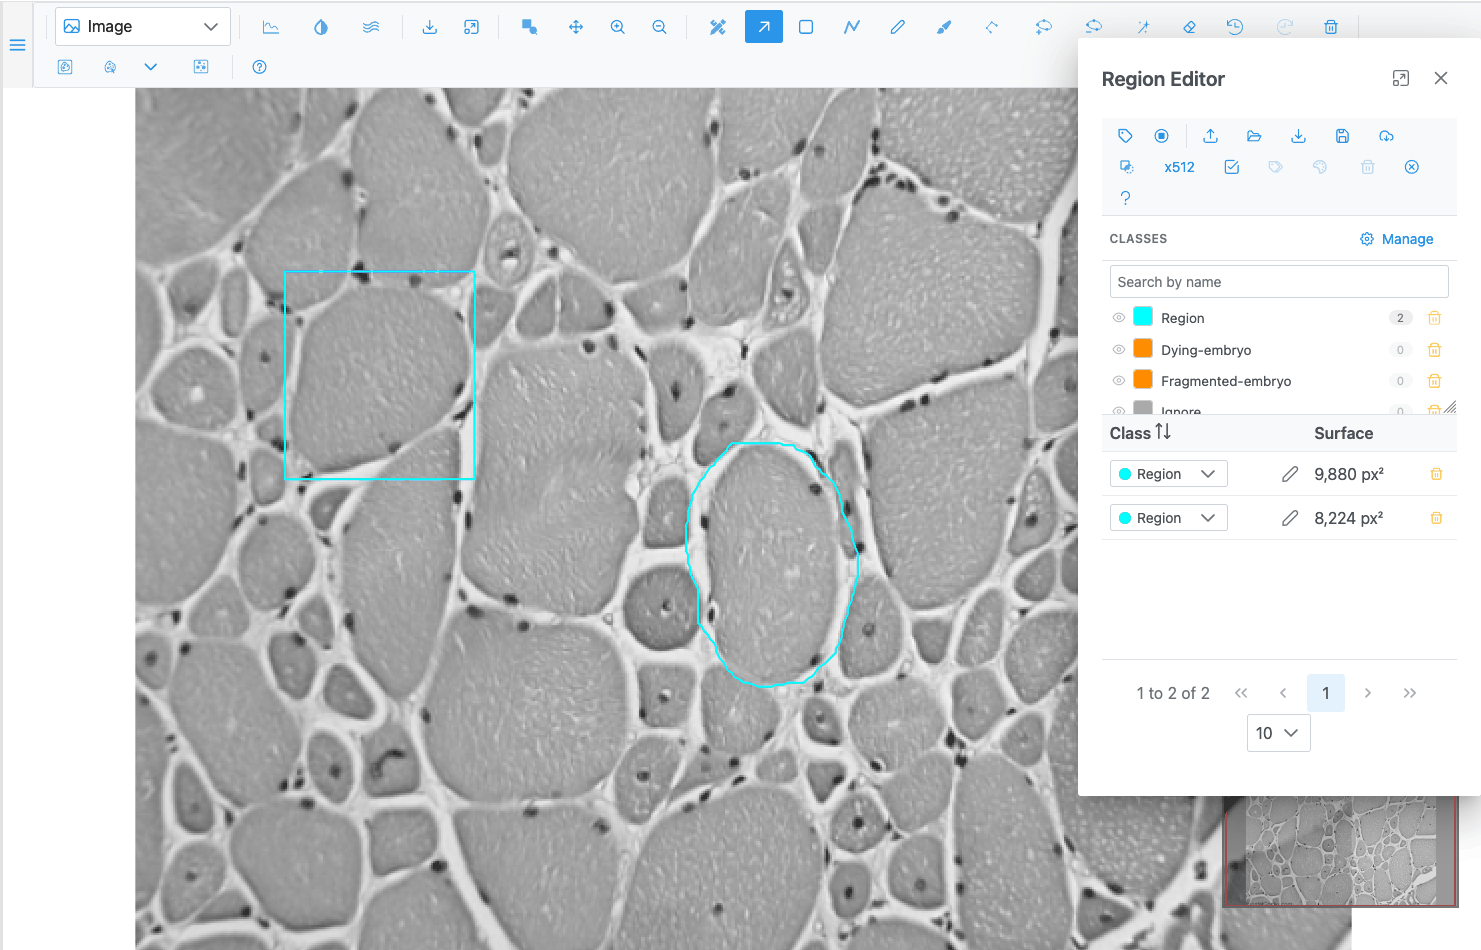
- Press R (or click Draw a rectangular region).
- Drag a rectangle around one muscle fibre.
- Press F (Draw a freeform region) and drag around another fibre, following its edge. Release to close the shape.
What you should see: both regions appear on the image and as two rows in the Region Editor, each with the class Region and its area in the Surface column. The area is in px² here, because this PNG does not record its pixel size; on a calibrated image it is in µm² or mm².
3. Let the wand find a fibre
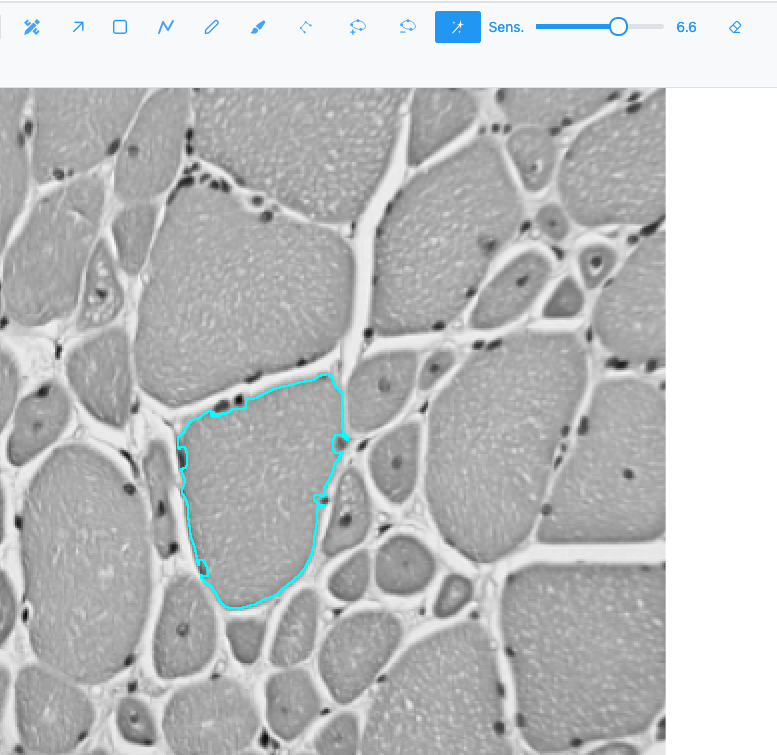
- Press W (or click
 Wand). A Sens. slider appears
next to the button.
- Click inside a third fibre. The wand grows a region over the pixels similar to the one you clicked.
- If the region spills into the background, raise Sens. (stricter) and click again; if it covers only part of the fibre, lower it. A click inside the existing wand region extends that same region.
- To remove a bit that leaked out, hold Shift and click or drag over it.
Note
The wand reads the pixels as they are displayed, so the result depends on the zoom level and on the contrast set in Channels & Histogram.
4. Paint with the brush and make a donut
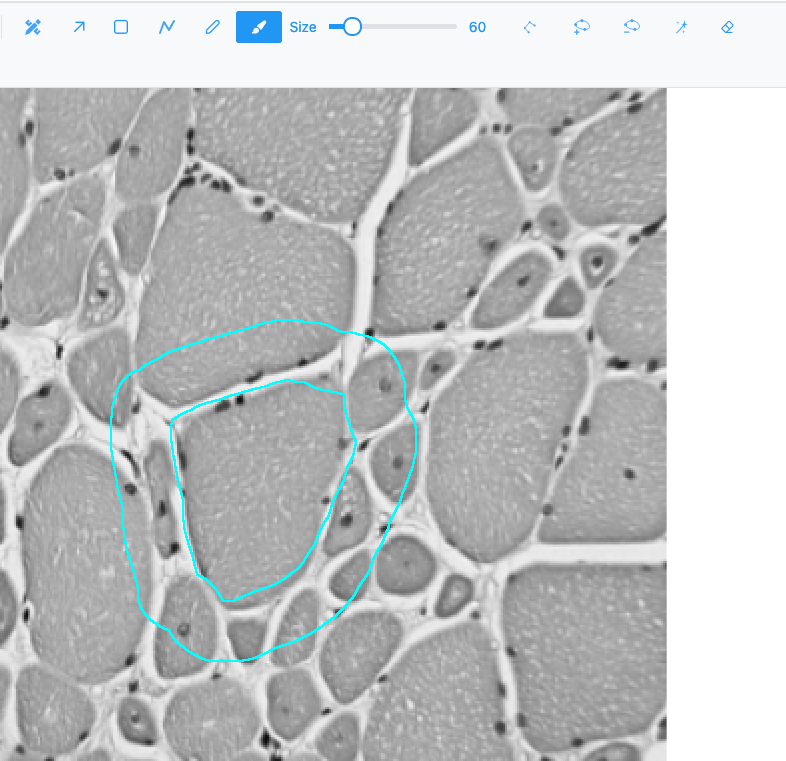
- Click
 Brush. A Size slider appears; set it to
about 40.
- Paint a ring along the inside edge of a fibre, all the way round, without painting its centre.
What you should see: one region shaped like a ring. The unpainted centre is a hole: the region is a donut, and its area in the table excludes the hole.
 3. Hold Shift and paint over part of the ring to erase it.
5. Edit outlines
- Press S (Selection mode) and click the freeform region. It is drawn thicker and its vertices show.
- Drag a vertex to move it. Drag the region's body to move the whole region.
- Click
 Add a vertex and click on the edge of the
selected region to insert a point.
- Click
 Delete a vertex and click a vertex to
remove it.
- Press E (Vertex eraser). Click or drag the circle over part of an outline: the vertices inside the circle are removed and the outline is rejoined at its edge. The Radius slider sets the circle's size.
Made a mistake? Press Ctrl+Z to undo, and Ctrl+Shift+Z or Ctrl+Y to redo. Up to 10 actions can be undone.
6. Combine regions
- Press S, click the rectangle, then Shift-click the freeform region. Both are selected.
- Right-click on the image. The menu starts with the region actions.
- Choose Merge / group.
What you should see: one region replaces the two. If they did not touch, the result is a single region in several parts; Ungroup in the same menu splits it again.
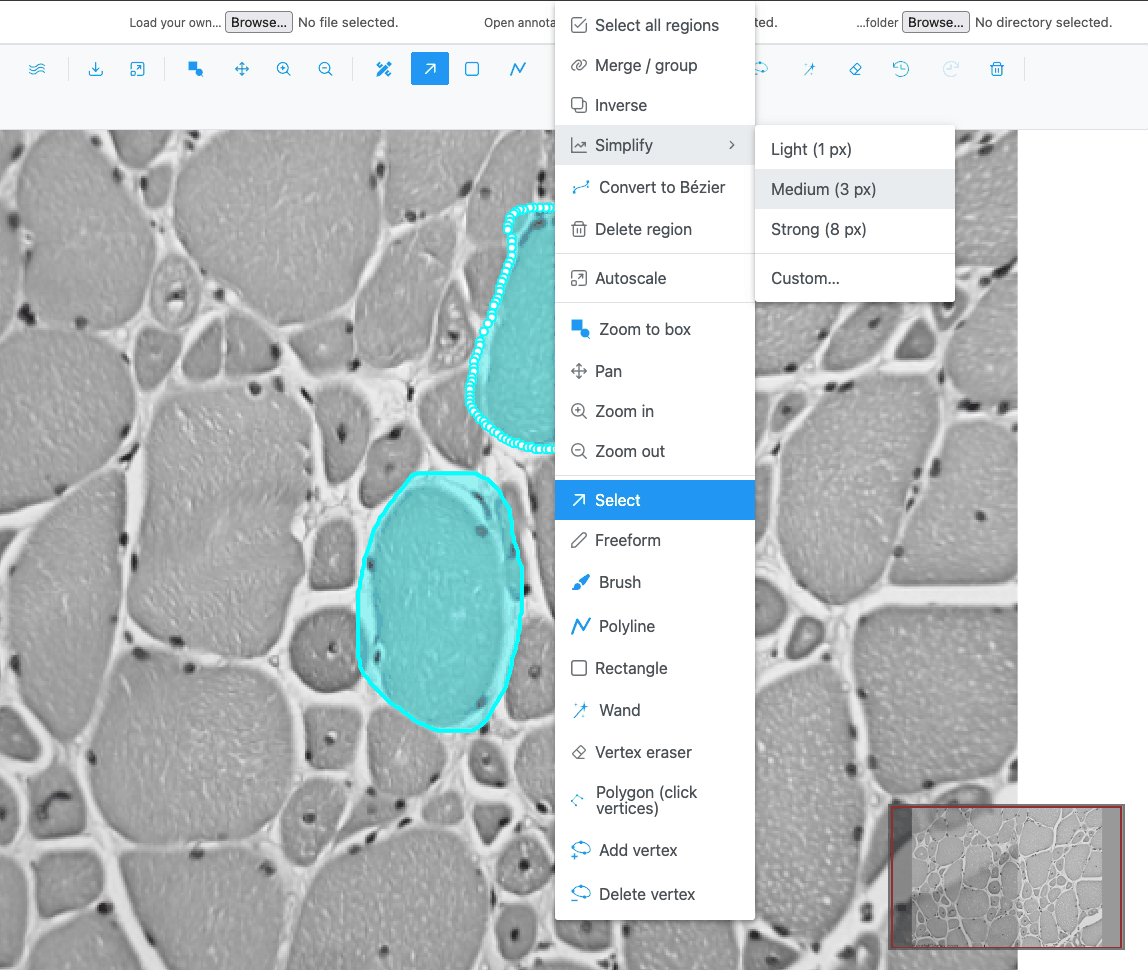
- Press Ctrl+Z to undo the merge; you will classify the regions separately.
7. Classify the regions
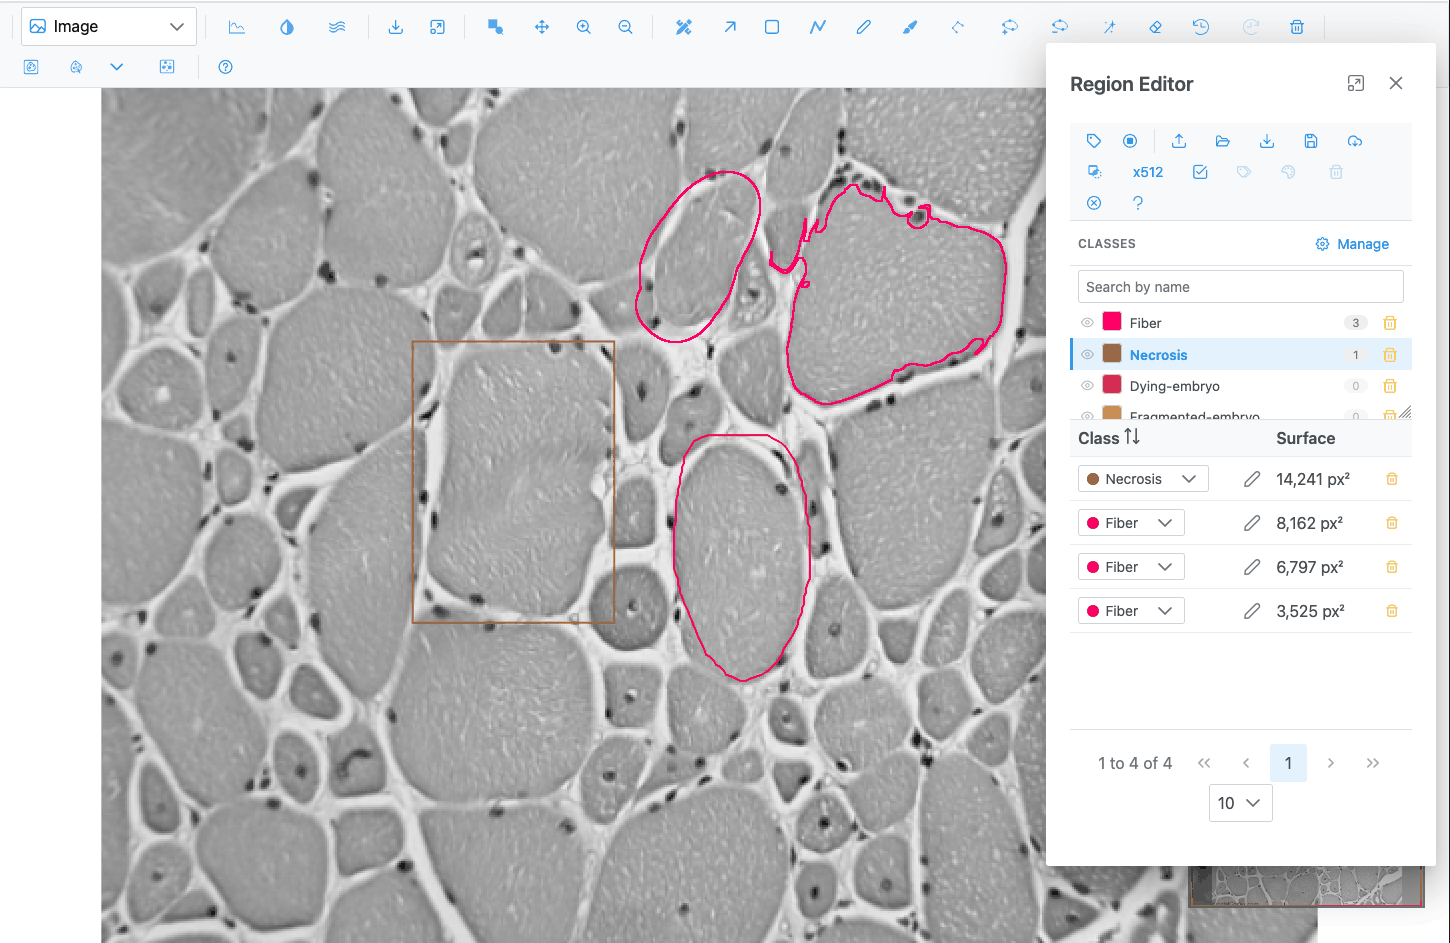
- In the Region Editor, click the first row's Class cell and pick Necrosis from the dropdown. The region takes that class's colour on the image.
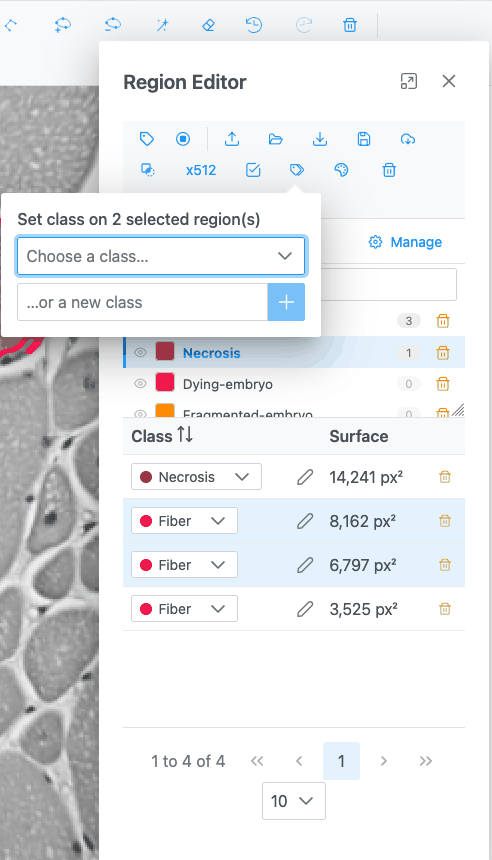
- Click a row, then Ctrl-click two more rows to select three regions at once. They are highlighted on the image too.
- Click Edit class on selected rows, type
Fibrein …or a new class and press Enter. All three regions are now in the new class Fibre, and Fibre appears in the Classes panel with a colour of its own. - In the Classes panel, click the colour swatch next to Fibre and pick another colour. Every region of that class changes colour.
Tip
Clicking a class name in the Classes panel while rows are selected applies that class to them. Newly drawn regions always start in the class Region; classify them afterwards.
8. Export the regions
- In the Region Editor toolbar, click Download regions as geojson file.
- In Export Regions, keep the suggested name
img01.geojsonand click Export.
What you should see: your browser saves a GeoJSON file. Each region is a feature whose
classification holds its class name and colour. Rectangles and freeform shapes are Polygons, the donut
keeps its hole, and polylines would be LineStrings.
Regions are not saved automatically
In the demo, regions live in the browser's memory. They survive switching to another image and back, but not a page reload. Export them (or, in an application with a server, use Save regions to server) to keep them.
9. Bring them back
- Click Delete all regions in the Region Editor and confirm.
- Click Import regions and pick the file you exported.
What you should see: all regions are back, with their classes and colours.
What you learned
- Drawing with the rectangle, freeform, wand and brush tools, and making a region with a hole.
- Editing outlines with Selection, the vertex tools and the vertex eraser; undo and redo.
- Merging regions from the right-click menu.
- Classifying regions one at a time or in bulk, and recolouring a class.
- Exporting to and importing from GeoJSON.
Next
- Segment cells with AI lets a model draw the regions for you.
- Annotation classes shows how to set up class presets you can reuse and share.
- The Region tools and Region Editor reference pages list every option.